NORTHWEST RHODESIAN RIDGEBACK CLUB
TRAINING
Obedience Foundation: Heeling
One of the most important aspects of obedience is proper heeling. Many of the obedience exercises are based on heeling, so it is important to get it right. But why this position anyway?
When your dog is in correct Heel position you can see his head without having to turn your head. You should be able to see your dog just by moving your eyes. It is important to know where your dog is, especially when you are working him.
The proper stationary Heel position is your dog on your left in a straight sit with his right front leg lined up with your left leg and he should be looking at you, waiting for a command. For Zak, this position is “Place”. From that position, he is ready to do what is next.
When in motion, the Heel position is his right front leg lined up with my left leg. When he is in that proper position, I can see his head. If I can’t see his head, he has fallen back or is too far away from my side.
Heeling is not easy for many dogs and I think most of them find it boring. So we need to make it fun and even challenging for some dogs. Teaching them where that correct position is needs to be the first thing you do and make it rewarding for the dog.
The best way to teach a dog Heel position is called “luring”. You have a treat in your hand and your hand is at the dog’s nose where you want the dog’s head to be. If you are starting with a puppy, you can use a long chew such as a tendon, or a long wooden spoon with peanut butter or Cheez Whiz on it that you can hold in your hand so you don’t have to bend over. The key things to remember about this are you MUST keep the lure in front of your dog’s nose, you must have the lure where you want your dog’s head to be and you CANNOT move your hand. It can take some practice to get this right, so practice without the dog at first. Once you can walk and hold your hand still where you want the dog to be, add the dog.
When you add the dog, make it fun! Don’t heel in a straight line for a long ways. Do short stints with lots of praise and encouragement with the lure. Start and stop, speed up and slow down. Make a game of it.
As your dog gets to know where he should be, you can wean off luring, but you still need to keep it fun and reward your dog. One thing to remember is you need to feed your dog with the left hand – if you feed with the right, your hand crosses in front of your body and your dog will get into the habit of wrapping around the left side of your body to keep his eye on that right hand. This is where crooked sits are formed. So get into the habit of feeding your dog with your left hand from the beginning. Wearing a vest with pockets is a great training tool – keep both pockets filled, you can quickly get a treat in either hand and your dog won’t have a bait pouch to concentrate on. (Make sure that when you are moving the vest is not hitting your dog in the head – if it does, you may need to zip up at least the bottom part of it.) If you do use a bait pouch, wear it more towards your back on the right side so it is out of your dog’s sight.
As with all training, be aware of your body language. Most of us have the tendency to look back at our dogs – avoid that impulse as it forces your dog back and out of heel position. It can help if you can train where there are mirrors, but it is more important to use your eyes on the dog – can you see his head without turning yours? If yes, he is in the right place! Practice using just your eyes to see your dog.
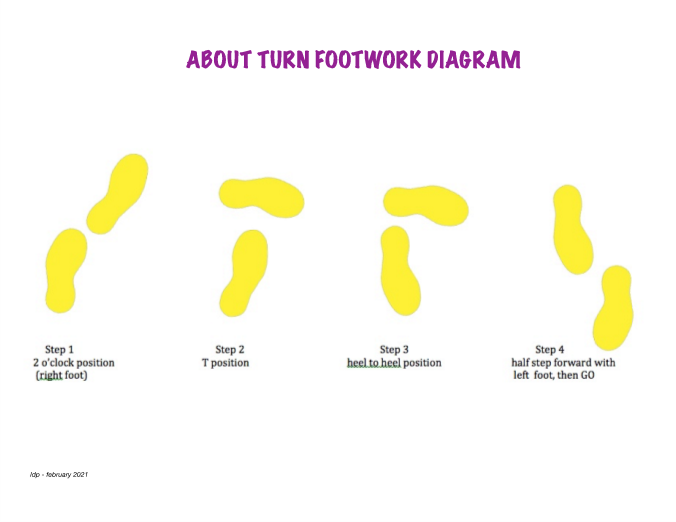
Footwork is important in heeling as well. You need to make smooth transitions between pace changes and when you stop. Combine footwork with body language so your dog knows what is going to happen. When you are coming to a halt, do what is called a “Break Step” – slow down - you can lean back slightly - and your foot placement is left – right – together - stop. Once you stop DO NOT MOVE YOUR FEET. If you shuffle your feet around, it is going to confuse your dog. When you are going to turn, turn your head and shoulder in the direction you are going to turn before you start the turn. An about turn means you are turning away from your dog. The footwork for this is to make “T’s” with your feet- see the diagram after this article.
When you change pace, take a step or two to speed up or slow down gradually. Don’t just take off running or suddenly slow down – if you do the former, your dog will be left behind and will then probably run ahead of you; if you do the latter, he will think you are stopping and may sit. Work towards a smooth transition between speeds for your dog. So watch your dog when you change pace to see if he is able to stay in Heel position. If he can’t, then smooth things out so he can. Most of this does not come naturally to people, so it is suggested you practice the footwork and pace changes without the dog until you have it down pretty well before you add the dog.
The about turn presents another problem, in that your dog must speed up to stay in Heel position. When you do an about turn, your dog has more ground to cover than you do, so that is why the footwork is set up the way it is – left heel in front of right toe, right heel in front of left toe, half step, normal stride. That half step allows your dog to keep up with you. When training, to keep your dog in proper position on the about turn, have a treat in your hand (right or left, whichever works best for you) and that treat should be positioned in front of your left thigh. This encourages the dog to wrap his head and forequarters around your left leg and speed up on the turn, thus staying in Heel position. This needs a lot of practice! So practice the about turns using your footwork and correct positioning of the treat to get that dog to wrap around you and speed into the turn so he doesn’t drop back and out of position.
And speaking of out of position (OOP on your score sheet) – if your dog tends to not stay in Heel position when you are training, you can do a couple of things to “surprise” him. If your dog forges (moves ahead of you), you can suddenly make a left turn INTO him – this means your right knee is going to come into contact with your dog’s shoulder. There is no warning here, you will just abruptly make a left turn and in the course of that turn, your right leg collides with the dog. You don’t need to hit the dog hard, but just bumping him with your knee is going to startle him and make him look at you. If a dog lags, or falls behind you out of Heel position, you can make a sudden turn away from him and take off rapidly. Or you can just take off fast moving ahead. Again, no warning. If you do one of these surprises every time your dog is out of Heel (meaning he is not paying attention to you like he should), he will start paying more attention and stay engaged with you. If your dog tends to walk too far from your side, you can train with him against a wall or on a curb. The wall will allow you to be close to him and if he gets too far away on a curb, he will go off the curb.
A very big thing to consider is the speed of your walk. If your dog has time to sniff and look around, you are not walking fast enough. Our breed is a big fast moving breed and we need to move fast to keep them interested. My own instructor used a metronome with me to see how fast I need to go to keep Zak engaged and it turned out to be 240 paces a minute – that’s fast! I thought I was going fast in the ring, but when I saw the video, it looked like I was barely moving. So bear in mind if you think you are moving fast, you may not be. Record your heeling with your dog and see how it turns out – it’s an invaluable tool! And do keep in mind that even though you need to move at a really fast pace, the time you spend heeling in the ring is not that long – you need to train yourself as well as your dog!
Again in training, make it interesting – speed up, slow down, stop, start, make turns. Another thing you can do is go straight for a few steps, then do a sudden sidestep, take a few paces then stop.
You also need to incorporate an Automatic Sit when you stop. This means your dog sits in Heel position without being told. When you are in the luring stage, as you are coming to a halt, the treat in your left hand should go up and back slightly, to lure the dog into the sit. When you are first out of the luring stage, your dog may still need a verbal cue. If that is the case, you want to give that cue BEFORE you stop; when you are doing your Break Step, tell the dog Sit as your right foot is hitting the ground just before you stop (left, right and Sit, together, stop).
One thing we have to deal with in our breed is a slow sit. I am not really sure why, but RR’s seem to sit pretty slowly – they don’t drop their rears on a dime like a lot of other breeds do. (My greyhounds were the same way, so maybe it’s the length of their bodies.) There is a training technique to get a faster sit from your dog and that’s to “drill” him – not do gradual stops using a Break Step. You can do some lightning stops with some leash work or luring to get your dog to sit more quickly. But do remember to keep it random – truly random. Dogs pick up on patterns amazingly fast and if you take three steps and stop repeatedly, they will go three steps and stop. So make it really random.
It looks so simple but like most things, it isn’t! There is a lot of nuance to heeling. Once your dog has that correct position down, a lot of other things will fall into place. If you watch people in the Obedience ring, you can tell the people who have worked heeling a lot. To see a dog heeling, and heeling well is a thing of beauty. It takes work, but it is really worth it.
Don’t complain, train!
Respectfully Submitted,
Lorraine Pedersen
Rowdy Red Dog Training, LLC